

Today’s guest post is by Ariel Curry and Liz Morrow of the Hungry Authors podcast.
Imagine you’re starting out on a road trip. First, you have to know where you’re going; then, you need a map to help you get there.
It’s the same with books. So often, aspiring authors start off on a “road trip” without a clear sense of where they’re going, let alone how to get there—and so they end up lost. We’re all for enjoying the journey just as much as the destination, but if you plan on bringing readers along on your trip, you better well have a plan. No one wants to sit in the car for hours while their driver says, “Let’s take this next turn and see what happens!”
Creating a book map is the best way to ensure you know where you want to take your reader, and how you’re going to get there.
A book map is a visual representation of your book’s structure. It can be as high-level or as detailed as you want, but the goal is that it provides a clear picture of exactly what content is going to go where in your book—creating a “map” that you can follow as you’re writing. Fiction authors commonly use book maps to track their plots and subplots and make sure that open story loops get closed.
But we believe book maps are invaluable for nonfiction books, too, where the goal is to inform, instruct, and inspire a reader. A book map will help you maintain momentum and ensure that the reader’s journey to your destination is as smooth as possible.
Here are a couple examples of book maps we’ve created with authors over the years:
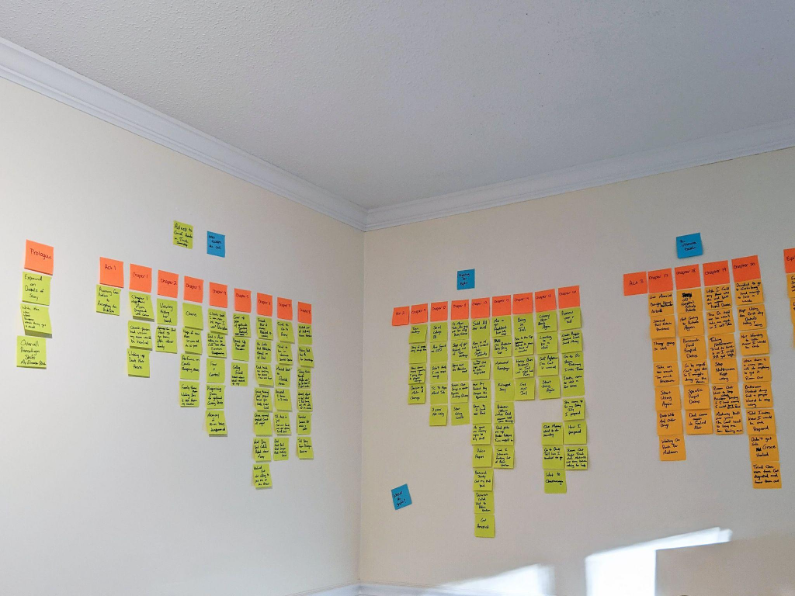
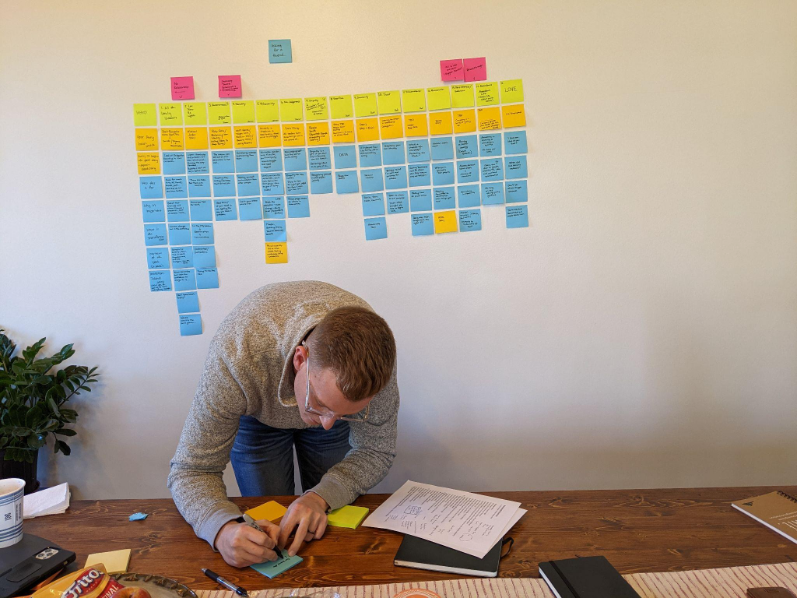
You can make book maps with analog tools like sticky notes or index cards laid out on a table or stuck to a window. A giant whiteboard often comes in handy. Or you can use the digital method, with tools like Mindmeister or Jamboard. The important part isn’t the appearance (although we love a good color-coded map!); it’s the thinking you do to create a logical journey through the book.
Here’s how you do it.
Get clear on the transformation.
All books are about transformation. Fiction is about the transformation of a character; memoirs are about the transformation of the author through an event/situation; and other nonfiction books are about the transformation of the reader. That’s what we’re focusing on today.
To figure out your reader’s transformation, you have to ask three questions:
- What is the reader’s current state?
- How do I want the reader to be different by the end of the book? (the transformation)
- How can I help the reader get there?
We like to brainstorm this “transformation tale” in a table like this:
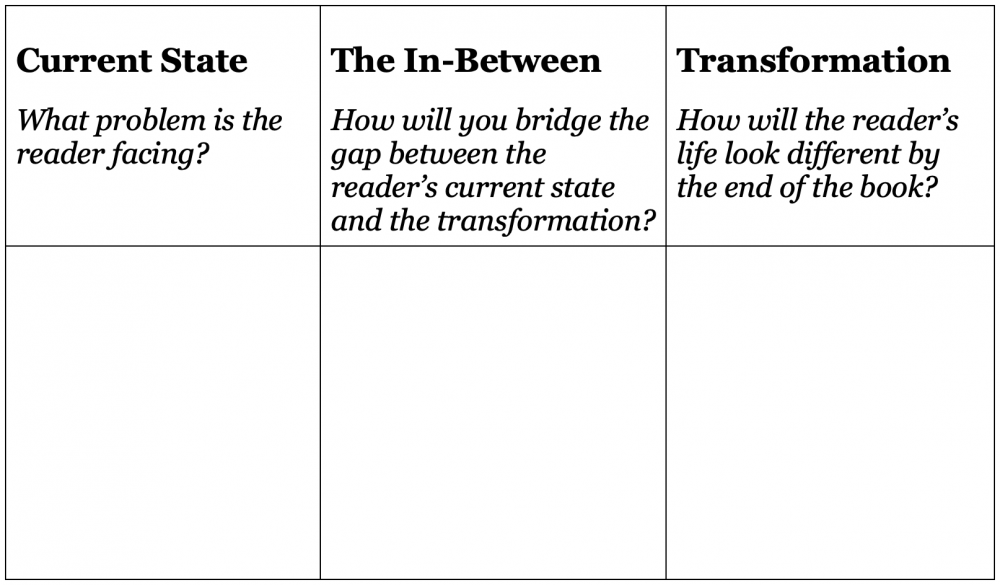
Don’t hold back—put everything you can think of into this table! Feel free to download your own version of this table here so you can play with it.
Creating this transformation tale helps us put boundaries around our book; it helps us decide what belongs and what doesn’t, where to start and where to end.
Map out the middle.
The “In-Between” section of your transformation tale is what will become the chapters of your book, so this is where we need to spend most of our time. If you’re feeling stuck on the “In-Between,” ask yourself how you accomplished the same transformation, or what you would say to a friend who came to you for advice in accomplishing that transformation.
As you look at your “In-Between” brainstorm, see if you can identify a possible pattern or order for the chapters to fall into.
Your in-between might follow a sequential order, like steps in a staircase leading up to the destination:
- First, this needs to happen
- Then, this can happen next
- And that can happen afterwards
- Then eventually, you’ll arrive at your transformation
Or your in-between might look more like a list of ingredients for a salad—toss everything together, and voila! Transformation.
Whichever approach you take, these ideas will become your chapters. Put each idea on a sticky note or index card, and lay them out horizontally across your window/wall/table. Try them out in different orders. The right order may come to you quickly, or you may have to play around with it until you find the one that feels the most intuitive.
Remember: Your book’s structure should feel intuitive and logical to the reader! If you feel stuck, bring in a trusted friend for their feedback.
Once you have these ideas in the right order, under each idea you’ll want to create cards for the elements that will comprise each chapter. We recommend including for each chapter:
- A good hook that captures the reader’s attention at the beginning of the chapter
- 2–3 key points that lead up to the chapter idea
- Stories to help illustrate those ideas
- Interactive elements like reflection questions, tools, or exercises to help the reader apply those ideas
- A closing section that wraps up this chapter and transitions the reader to the next chapter idea
You might decide to include other elements as well, depending on your book’s content (like data, personal stories from your life, quotes from other books, etc.).
Put each of these elements on separate cards and list them vertically underneath each chapter’s card. Bonus points if you use different colors for each element, so that you can see at a glance where you might be missing something when you look at your whole map!
To do this for each chapter takes a lot of brain work and time. It can often take us 6 to 8 or more hours with clients to make sure we’ve captured everything we want to include in the book. Go slowly and break the process up over multiple days. When you’re ready to start writing, you’ll be so glad you took the time to think through everything!
We find it’s almost impossible for writers to get stuck once they’ve done all of this thinking. A little bit of a time investment up front can save you days, weeks, months, or even years of wandering without a plan for your book.
Helpful reminders
Here are the keys to making more efficient and effective book maps:
- Practice mapping out your comparative titles first. You’ll learn so much about how other authors organize their thinking on similar topics, and you’ll clearly see how your book can stand out and add value to your reader.
- Book mapping is iterative and adaptable. Like using Google Maps when you drive, your book map can and should change to redirect you when you run into a theoretical “roadblock.” Remain clear on the ultimate transformation you want to accomplish, but realize that for most books, many roads will get you there. Choose the one that feels most intuitive to you and be willing to try something different if that doesn’t work.
Often, when we finish creating a book map, authors step back from the whole thing and realize—that’s it! That’s the book. It’s the best part of the whole process—when you realize that you really can do this. You’ve basically already done it! Writing the book becomes an exercise in simply putting flesh on those bones. Seeing your book map is a big step in building your self-efficacy to write the book.
We love seeing authors’ book maps, too! If you create a book map, please tag us @hungryauthors on Instagram so we can admire your brilliance and share your work with the world!
Ariel Curry is a writer, editor, and book coach at Ariel Curry Editorial with over 10 years of experience in traditional publishing. She enjoys brainstorming and outlining new book ideas, bringing clarity and purpose to prose, and helping authors find resilience in their writing journey. When she’s not working on books, you can find Ariel doing yoga, playing piano, beekeeping, or reading with a glass of wine. She lives in Chattanooga, TN, with her husband and their rescue dogs, Enyo and Tenaya.
Liz Morrow is a traditionally-published ghostwriter for entrepreneurs, thought leaders, and business experts. She specializes in personal and professional development and memoir. Though she has experience in every piece of the pipeline—including book ideation, planning, positioning, editing, and marketing—writing has always been the part she loves most. She is proud to have worked with authors such as Grant Baldwin, Jeff Goins, Pat Flynn, and Whitney English and publishers such as Baker Books, Harper Horizon, Harper Leadership, and Hay House. When she’s not writing, you can find Liz listening to long-form podcasts, rewatching The Office, and drinking margaritas with friends. She lives in Greenville, SC with her husband, two children, and goldendoodle.


This is an amazing article. I use many of these processes, as I come to authoring with a Scrum project management background, but this touches on a lot that I need to include. Thank you
This is so helpful! I think this is where many writers get stuck and discouraged. I plan to work through this mapping process with my book concept in the coming weeks and hopefully get to that “Aha!” moment you describe where the reader’s journey of transformation becomes clear. Thank you for this resource!
This upbeat post is extremely helpful and clear. It happens to come at the perfect moment for me, when I have written most of my material but cannot envision the structure. Thank you both!
Check out Miro, specifically the Post-it not function. You can do what’s discussed above … and more!
I was familiar with the book mapping concept, but hadn’t applied it to my current work in progress. Time to get going. I especially like the emphasis on keeping transformation in mind.